Using Markdown
Table of Contents
Overview
Nearly all Markdown applications support the basic syntax outlined in the original Markdown design document. There are minor variations and discrepancies between Markdown processors — those are noted inline wherever possible.
Note about Line Breaks: Markdown signifies linebreaks with 2 spaces (” “). So if your text on a file has a line break, but in the website view it doesn’t have a line break, try putting 2 spaces and then hitting enter for the line break.
Headings
To create a heading, add number signs (#) in front of a word or phrase. The number of number signs you use should correspond to the heading level. For example, to create a heading level three (<h3>), use three number signs (e.g., ### My Header).
| Markdown | HTML | Rendered Output |
|---|---|---|
# Heading level 1 | <h1>Heading level 1</h1> | # Heading level 1 |
## Heading level 2 | <h2>Heading level 2</h2> | ## Heading level 2 |
### Heading level 3 | <h3>Heading level 3</h3> | ### Heading level 3 |
#### Heading level 4 | <h4>Heading level 4</h4> | #### Heading level 4 |
##### Heading level 5 | <h5>Heading level 5</h5> | ##### Heading level 5 |
###### Heading level 6 | <h6>Heading level 6</h6> | ###### Heading level 6 |
Alternate Syntax
Alternatively, on the line below the text, add any number of == characters for heading level 1 or -- characters for heading level 2.
| Markdown | HTML | Rendered Output |
|---|---|---|
Heading level 1=============== | <h1>Heading level 1</h1> | Heading level 1 |
Heading level 2--------------- | <h2>Heading level 2</h2> | Heading level 2 |
Heading Best Practices
Markdown applications don’t agree on how to handle a missing space between the number signs (#) and the heading name. For compatibility, always put a space between the number signs and the heading name.
| ✅ Do this | ❌ Don’t do this |
|---|---|
# Here's a Heading | #Here's a Heading |
You should also put blank lines before and after a heading for compatibility.
| ✅ Do this | ❌ Don’t do this |
|---|---|
| `Try to put a blank line before… |
    # Heading

    ...and after a heading.` | `Without blank lines, this might not look right.
    # Heading
    Don't do this!` |
Paragraphs
To create paragraphs, use a blank line to separate one or more lines of text.
| Markdown | HTML | Rendered Output |
|---|---|---|
| `I really like using Markdown. |
      I think I'll use it to format all of my documents from now on.` | `<p>I really like using Markdown.</p>

    <p>I think I'll use it to format all of my documents from now on.</p>` | I really like using Markdown. I think I'll use it to format all of my documents from now on. |
Paragraph Best Practices
Unless the paragraph is in a list, don’t indent paragraphs with spaces or tabs.
Note: If you need to indent paragraphs in the output, see the section on how to indent (tab).
| ✅ Do this | ❌ Don’t do this |
|---|---|
| `Don’t put tabs or spaces in front of your paragraphs. |
      Keep lines left-aligned like this.` | `This can result in unexpected
    formatting problems.

      Don't add tabs or spaces in front of paragraphs.` |
Line Breaks
To create a line break or new line (<br>), end a line with two or more spaces, and then type return.
| Markdown | HTML | Rendered Output |
|---|---|---|
| `This is the first line. | ||
And this is the second line. | <p>This is the first line. |
    And this is the second line.</p>` | This is the first line.

    And this is the second line. |
Line Break Best Practices
You can use two or more spaces (commonly referred to as “trailing whitespace”) for line breaks in nearly every Markdown application. Though, It’s hard to see trailing whitespace in an editor, and many people accidentally or intentionally put two spaces after every sentence. For this reason, some people may want to use something other than trailing whitespace for line breaks. If your Markdown application supports HTML, you can use the <br> HTML tag. For compatibility, use trailing white space or the <br> HTML tag at the end of the line.
There are two other options I don’t recommend using. CommonMark and a few other lightweight markup languages let you type a backslash (\) at the end of the line, but not all Markdown applications support this, so it isn’t a great option from a compatibility perspective. And at least a couple lightweight markup languages don’t require anything at the end of the line — just type return and they’ll create a line break.
| ✅ Do this | ❌ Don’t do this | | — | — | | `First line with two spaces after. And the next line.
      First line with the HTML tag after.<br>
      And the next line.` | `First line with a backslash after.\
    And the next line.

    First line with nothing after.
    And the next line.` |
You can add emphasis by making text bold or italic.
Text Style
Bold
To bold text, add two asterisks or underscores before and after a word or phrase. To bold the middle of a word for emphasis, add two asterisks without spaces around the letters.
| Markdown | HTML | Rendered Output |
|---|---|---|
I just love **bold text**. | I just love <strong>bold text</strong>. | I just love bold text. |
Italic
To italicize text, add one asterisk or underscore before and after a word or phrase. To italicize the middle of a word for emphasis, add one asterisk without spaces around the letters.
| Markdown | HTML | Rendered Output |
|---|---|---|
Italicized text is the *cat's meow*. | Italicized text is the <em>cat's meow</em>. | Italicized text is the cat’s meow. |
Bold and Italic
To emphasize text with bold and italics at the same time, add three asterisks or underscores before and after a word or phrase. To bold and italicize the middle of a word for emphasis, add three asterisks without spaces around the letters.
| Markdown | HTML | Rendered Output |
|---|---|---|
This text is ***really important***. | This text is <em><strong>really important</strong></em>. | This text is really important. |
Color
Use HTML tags to change text color. The color attribute allows you to specify the font color using a color’s name or the hexadecimal #RRGGBB code.
<font color="red">This text is red!</font>
Code
To denote a word or phrase as code, enclose it in backticks (```).
| Markdown | HTML | Rendered Output |
|---|---|---|
At the command prompt, type nano. | At the command prompt, type <code>nano</code>. | At the command prompt, type nano. |
Escaping Backticks
If the word or phrase you want to denote as code includes one or more backticks, you can escape it by enclosing the word or phrase in double backticks (````).
| Markdown | HTML | Rendered Output |
|---|---|---|
Use `code` in your Markdown file. | <code>Use code in your Markdown file.</code> | Use code in your Markdown file. |
Blockquotes
To create a blockquote, add a > in front of a paragraph.
> Dorothy followed her through many of the beautiful rooms in her castle.
The rendered output looks like this:
Dorothy followed her through many of the beautiful rooms in her castle.
Blockquotes with Multiple Paragraphs
Blockquotes can contain multiple paragraphs. Add a > on the blank lines between the paragraphs.
`> Dorothy followed her through many of the beautiful rooms in her castle.
The Witch bade her clean the pots and kettles and sweep the floor and keep the fire fed with wood.`
The rendered output looks like this:
Dorothy followed her through many of the beautiful rooms in her castle.
The Witch bade her clean the pots and kettles and sweep the floor and keep the fire fed with wood.
Nested Blockquotes
Blockquotes can be nested. Add a >> in front of the paragraph you want to nest.
`> Dorothy followed her through many of the beautiful rooms in her castle.
The Witch bade her clean the pots and kettles and sweep the floor and keep the fire fed with wood.`
The rendered output looks like this:
Dorothy followed her through many of the beautiful rooms in her castle.
The Witch bade her clean the pots and kettles and sweep the floor and keep the fire fed with wood.
Blockquotes with Other Elements
Blockquotes can contain other Markdown formatted elements. Not all elements can be used — you’ll need to experiment to see which ones work.
`> #### The quarterly results look great!
- Revenue was off the chart.
- Profits were higher than ever.
Everything is going according to plan.`
The rendered output looks like this:
The quarterly results look great!
- Revenue was off the chart.
- Profits were higher than ever.
Everything is going according to plan.
Blockquotes Best Practices
For compatibility, put blank lines before and after blockquotes.
| ✅ Do this | ❌ Don’t do this |
|---|---|
| `Try to put a blank line before… |
    > This is a blockquote

    ...and after a blockquote.` | `Without blank lines, this might not look right.
    > This is a blockquote
    Don't do this!` |
Links
To create a link, enclose the link text in brackets (e.g., [Holmes Lab Website]) and then follow it immediately with the URL in parentheses (e.g., (https://holmeslab.rutgers.edu)).
Navigate to the [Holmes Lab Website](https://holmeslab.rutgers.edu).
The rendered output looks like this:
Navigate to the Holmes Lab Website
Note: To link to an element on the same page, see linking to heading IDs. To create a link that opens in a new tab or window, see the section on link targets.
Adding Titles
You can optionally add a title for a link. This will appear as a tooltip when the user hovers over the link. To add a title, enclose it in quotation marks after the URL.
Here’s a link to the [Holmes Lab Website]([https://holmeslab.rutgers.edu/](https://holmeslab.rutgers.edu/) "Lab Website").
The rendered output looks like this:
Here’s a link to the Holmes Lab Website.
URLs and Email Addresses
To quickly turn a URL or email address into a link, enclose it in angle brackets.
<https://www.markdownguide.org> <fake@example.com>
The rendered output looks like this:
Formatting Links
To emphasize links, add asterisks before and after the brackets and parentheses. To denote links as code, add backticks in the brackets.
I love supporting the **[EFF](https://eff.org)**. This is the *[Markdown Guide](https://www.markdownguide.org)*. See the section on [code](#code).
The rendered output looks like this:
I love supporting the EFF.
This is the Markdown Guide.
See the section on code.
Reference-style Links
Reference-style links are a special kind of link that make URLs easier to display and read in Markdown. Reference-style links are constructed in two parts: the part you keep inline with your text and the part you store somewhere else in the file to keep the text easy to read.
Formatting the First Part of the Link
The first part of a reference-style link is formatted with two sets of brackets. The first set of brackets surrounds the text that should appear linked. The second set of brackets displays a label used to point to the link you’re storing elsewhere in your document.
Although not required, you can include a space between the first and second set of brackets. The label in the second set of brackets is not case sensitive and can include letters, numbers, spaces, or punctuation.
This means the following example formats are roughly equivalent for the first part of the link:
[hobbit-hole][1][hobbit-hole] [1]
Formatting the Second Part of the Link
The second part of a reference-style link is formatted with the following attributes:
- The label, in brackets, followed immediately by a colon and at least one space (e.g.,
[label]:). - The URL for the link, which you can optionally enclose in angle brackets.
- The optional title for the link, which you can enclose in double quotes, single quotes, or parentheses.
This means the following example formats are all roughly equivalent for the second part of the link:
[1]: https://en.wikipedia.org/wiki/Hobbit#Lifestyle[1]: https://en.wikipedia.org/wiki/Hobbit#Lifestyle "Hobbit lifestyles"[1]: https://en.wikipedia.org/wiki/Hobbit#Lifestyle 'Hobbit lifestyles'[1]: https://en.wikipedia.org/wiki/Hobbit#Lifestyle (Hobbit lifestyles)[1]: <https://en.wikipedia.org/wiki/Hobbit#Lifestyle> "Hobbit lifestyles"[1]: <https://en.wikipedia.org/wiki/Hobbit#Lifestyle> 'Hobbit lifestyles'[1]: <https://en.wikipedia.org/wiki/Hobbit#Lifestyle> (Hobbit lifestyles)
You can place this second part of the link anywhere in your Markdown document. Some people place them immediately after the paragraph in which they appear while other people place them at the end of the document (like endnotes or footnotes).
An Example Putting the Parts Together
Say you add a URL as a standard URL link to a paragraph and it looks like this in Markdown:
In a hole in the ground there lived a hobbit. Not a nasty, dirty, wet hole, filled with the ends of worms and an oozy smell, nor yet a dry, bare, sandy hole with nothing in it to sit down on or to eat: it was a [hobbit-hole](https://en.wikipedia.org/wiki/Hobbit#Lifestyle "Hobbit lifestyles"), and that means comfort.
Though it may point to interesting additional information, the URL as displayed really doesn’t add much to the existing raw text other than making it harder to read. To fix that, you could format the URL like this instead:
`In a hole in the ground there lived a hobbit. Not a nasty, dirty, wet hole, filled with the ends of worms and an oozy smell, nor yet a dry, bare, sandy hole with nothing in it to sit down on or to eat: it was a [hobbit-hole][1], and that means comfort.
[1]: https://en.wikipedia.org/wiki/Hobbit#Lifestyle “Hobbit lifestyles”`
In both instances above, the rendered output would be identical:
In a hole in the ground there lived a hobbit. Not a nasty, dirty, wet hole, filled with the ends of worms and an oozy smell, nor yet a dry, bare, sandy hole with nothing in it to sit down on or to eat: it was a hobbit-hole, and that means comfort.
and the HTML for the link would be:
<a href="https://en.wikipedia.org/wiki/Hobbit#Lifestyle" title="Hobbit lifestyles">hobbit-hole</a>
Link Best Practices
Markdown applications don’t agree on how to handle spaces in the middle of a URL. For compatibility, try to URL encode any spaces with ` . Alternatively, if your Markdown application [supports HTML](https://www.markdownguide.org/basic-syntax/#html), you could use the a` HTML tag.
| ✅ Do this | ❌ Don’t do this |
|---|---|
| `link |
<a href="https://www.example.com/my great page">link</a>` | `[link](https://www.example.com/my great page)` |
Parentheses in the middle of a URL can also be problematic. For compatibility, try to URL encode the opening parenthesis (() with %28 and the closing parenthesis ()) with %29. Alternatively, if your Markdown application supports HTML, you could use the a HTML tag.
| ✅ Do this | ❌ Don’t do this |
|---|---|
| `a novel |
<a href="https://en.wikipedia.org/wiki/The_Milagro_Beanfield_War_(novel)">a novel</a>` | `[a novel](https://en.wikipedia.org/wiki/The_Milagro_Beanfield_War_(novel))` |
Lists
You can organize items into ordered and unordered lists.
Ordered Lists
To create an ordered list, add line items with numbers followed by periods. The numbers don’t have to be in numerical order, but the list should start with the number one.
| Markdown | HTML | Rendered Output | | — | — | — | | 1. First item 2. Second item 3. Third item 4. Fourth item | <ol> <li>First item</li> <li>Second item</li> <li>Third item</li> <li>Fourth item</li> </ol> | 1. First item
- Second item
- Third item
- Fourth item | |
1. First item 1. Second item 1. Third item 1. Fourth item|<ol> <li>First item</li> <li>Second item</li> <li>Third item</li> <li>Fourth item</li> </ol>| 1. First item - Second item
- Third item
- Fourth item | |
1. First item 8. Second item 3. Third item 5. Fourth item|<ol> <li>First item</li> <li>Second item</li> <li>Third item</li> <li>Fourth item</li> </ol>| 1. First item - Second item
- Third item
- Fourth item | |
1. First item 2. Second item 3. Third item 1. Indented item 2. Indented item 4. Fourth item|<ol> <li>First item</li> <li>Second item</li> <li>Third item <ol> <li>Indented item</li> <li>Indented item</li> </ol> </li> <li>Fourth item</li> </ol>| 1. First item - Second item
Third item
- Indented item
- Indented item
Fourth item
Bullet/Unordered Lists
To create an unordered list, add dashes (-), asterisks (*), or plus signs (+) in front of line items. Indent one or more items to create a nested list.
| Markdown | HTML | Rendered Output | | — | — | — | | - First item - Second item - Third item - Fourth item | <ul> <li>First item</li> <li>Second item</li> <li>Third item</li> <li>Fourth item</li> </ul> | • First item • Second item • Third item • Fourth item | | * First item * Second item * Third item * Fourth item | <ul> <li>First item</li> <li>Second item</li> <li>Third item</li> <li>Fourth item</li> </ul> | • First item • Second item • Third item • Fourth item |
Toggle Lists
A toggle list takes a bit of HTML coding tags, but then enables the user to toggle the bullets to view and hide them.
| `
- Apples
- Oranges
- Milk
</details>` | | — |
- Shopping list (click me!)
- Apples
- Oranges
- Milk
So it’s the same as a bullet list, except adding the <details markdown="block"> and </details> at the start and end, and adding </summary> to your title text
Code Blocks
Code blocks are surrounded by ```. This is how to format a code block:
```bash (or whatever language you want to code in)
code code code
This creates:

```bash
code code code
Divider Lines
To create a horizontal rule, use three or more asterisks (***), dashes (---), or underscores (___) on a line by themselves.
The rendered output of all three looks identical:
Divider line Best Practices
For compatibility, put blank lines before and after horizontal rules.
| ✅ Do this | ❌ Don’t do this |
|---|---|
| `Try to put a blank line before… |
    ---

    ...and after a horizontal rule.` | `Without blank lines, this would be a heading.
    ---
    Don't do this!` |
Images
To add an image, add an exclamation mark (!), followed by alt text in brackets, and the path or URL to the image asset in parentheses. You can optionally add a title in quotation marks after the path or URL.

The rendered output looks like this:

Embedding Images from Online
To add a link to an image, enclose the Markdown for the image in brackets, and then add the link in parentheses.
[](https://www.flickr.com/photos/beaurogers/31833779864/in/photolist-Qv3rFw-34mt9F-a9Cmfy-5Ha3Zi-9msKdv-o3hgjr-hWpUte-4WMsJ1-KUQ8N-deshUb-vssBD-6CQci6-8AFCiD-zsJWT-nNfsgB-dPDwZJ-bn9JGn-5HtSXY-6CUhAL-a4UTXB-ugPum-KUPSo-fBLNm-6CUmpy-4WMsc9-8a7D3T-83KJev-6CQ2bK-nNusHJ-a78rQH-nw3NvT-7aq2qf-8wwBso-3nNceh-ugSKP-4mh4kh-bbeeqH-a7biME-q3PtTf-brFpgb-cg38zw-bXMZc-nJPELD-f58Lmo-bXMYG-bz8AAi-bxNtNT-bXMYi-bXMY6-bXMYv)
The rendered output looks like this:

Image Size
The Markdown syntax for images doesn’t allow you to specify the width and height of images. If you need to resize an image and your Markdown processor supports HTML, you can use the img HTML tag with the width and height attributes to set the dimensions of an image in pixels. <img src="image.png" width="200" height="100">
NOTE: Make sure to put the image not in a folder, but in the same folder level as the script
The rendered output will contain the image resized to the dimensions you specified.
Image Captions
Markdown doesn’t natively support image captions, but there are two possible workarounds. If your Markdown application supports HTML, you can use the figure and figcaption HTML tags to add a caption for your image.
<figure> <img src="/assets/images/albuquerque.jpg" alt="Albuquerque, New Mexico"> <figcaption>A single track trail outside of Albuquerque, New Mexico.</figcaption> </figure>
Escaping Characters
To display a literal character that would otherwise be used to format text in a Markdown document, add a backslash (\) in front of the character.
\* Without the backslash, this would be a bullet in an unordered list.
The rendered output looks like this:
- Without the backslash, this would be a bullet in an unordered list.
Characters You Can Escape
You can use a backslash to escape the following characters.
| Character | Name | |
|---|---|---|
| \ | backslash | |
| ` | backtick (see also escaping backticks in code) | |
| * | asterisk | |
| _ | underscore | |
| { } | curly braces | |
| [ ] | brackets | |
| < > | angle brackets | |
| ( ) | parentheses | |
| # | pound sign | |
| + | plus sign | |
| - | minus sign (hyphen) | |
| . | dot | |
| ! | exclamation mark | |
| pipe (see also escaping pipe in tables) |
HTML
Many Markdown applications allow you to use HTML tags in Markdown-formatted text. This is helpful if you prefer certain HTML tags to Markdown syntax. For example, some people find it easier to use HTML tags for images. Using HTML is also helpful when you need to change the attributes of an element, like specifying the color of text or changing the width of an image.
To use HTML, place the tags in the text of your Markdown-formatted file.
This **word** is bold. This <em>word</em> is italic.
The rendered output looks like this:
This word is bold. This word is italic.
HTML Best Practices
For security reasons, not all Markdown applications support HTML in Markdown documents. When in doubt, check your Markdown application’s documentation. Some applications support only a subset of HTML tags.
Use blank lines to separate block-level HTML elements like <div>, <table>, <pre>, and <p> from the surrounding content. Try not to indent the tags with tabs or spaces — that can interfere with the formatting.
You can’t use Markdown syntax inside block-level HTML tags. For example, <p>italic and **bold**</p> won’t work.
Special Formatting
Callouts
These are specific callout formatting in our site. They are colored green for .new-title and red for .warning. You can create more callout types and customize their style by adding
{: .new-title }
> Green Callout
>
> text in here
Green Callout
text in here
{: .warning }
> Red Callout
> text in here
Red Callout text in here
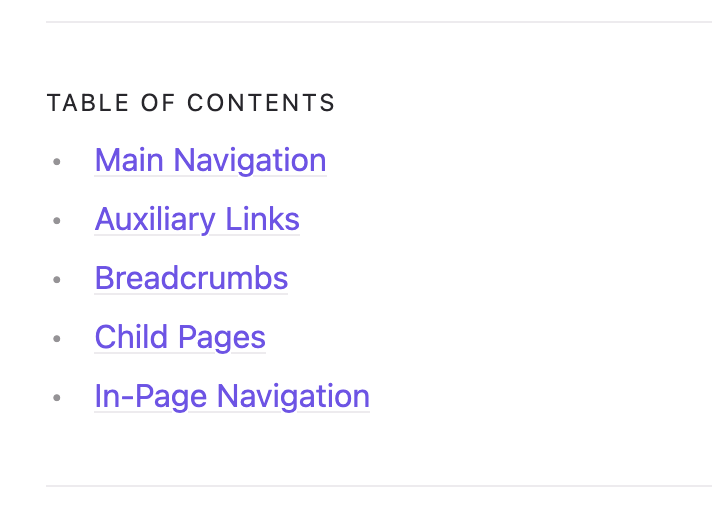
Table of Contents
Insert this line of code into your page and it will generate a table of contents based on the headings which appear in that file, unless the heading has {: .no_toc .text-delta } beneath it.
1. TOC
{:toc}
To make a nice table of contents, this format is recommended
---
### Table of Contents
1. TOC
{:toc}
---
This creates:
Tables
You can make a table like this
| name        | head two          | three |
|:-------------|:------------------|:------|
| ok           | good swedish fish | nice  |
| out of stock | good and plenty   | nice  |
| ok           | good `oreos`      | hmm   |
| name | head two | three |
|---|---|---|
| ok | good swedish fish | nice |
| out of stock | good and plenty | nice |
| ok | good oreos | hmm |
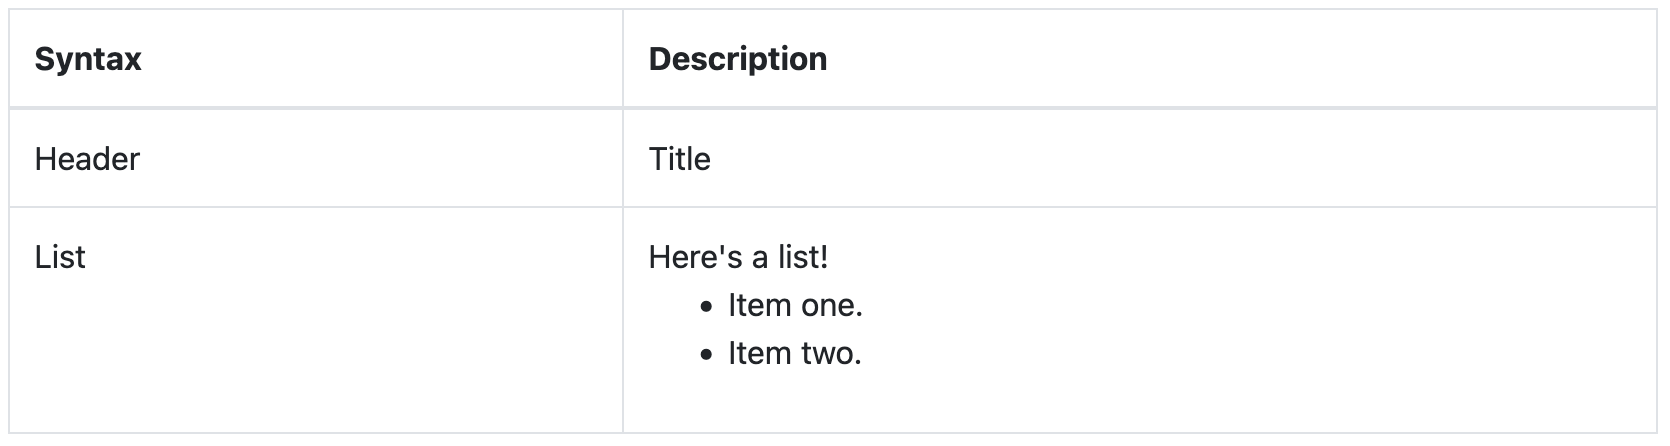
Lists Within Table Cells
You can add a list within a table cell by using HTML tags.
| Syntax | Description | | ----------- | ----------- | | Header | Title | | List | Here's a list! <ul><li>Item one.</li><li>Item two.</li></ul> |
The rendered output looks like this:
Divider
You can create a divider like this:
* * * #or
---
which renders:
Labels
Labels like the following can be created with the example code below. For more colors/customizations, you’ll have to edit the labels.scss file in the codebase.

### Labels

Label type 1
{: .label }

blue
{: .label .label-blue }
green
{: .label .label-green }
purple
{: .label .label-purple }
yellow
{: .label .label-yellow }
red
{: .label .label-red }

**bold**
{: .label }
*italic*
{: .label }
***bold + italic***
{: .label }
Diagrams/Flow charts
To create a chart like this, markdown/jekyll uses mermaid. Below is a simple code block, but if you want to know how to make more complex charts, look up Mermaid’s documentation.
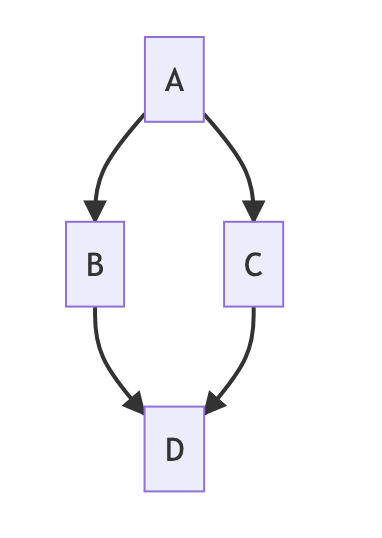
```mermaid
graph TD;
    accTitle: the diamond pattern
    accDescr: a graph with four nodes: A points to B and C, while B and C both point to D
    A-->B;
    A-->C;
    B-->D;
    C-->D;
### Buttons

To make a button like this:

[View it on GitHub]([https://github.com/HolmesLab/holmeslab](https://github.com/HolmesLab/holmeslab)){: .btn .fs-5 .mb-4 .mb-md-0 }

```markdown
[View it on GitHub](link){: .btn .fs-5 .mb-4 .mb-md-0 }
Color Schemes
Just the Docs supports two color schemes: light (default), and dark. To enable a color scheme, set the color_scheme parameter in your site’s _config.yml file:
# Color scheme currently only supports "dark", "light"/nil (default), or a custom scheme that you define
color_scheme: nil
Or, you can have a button on the page which switches between dark and light
```yaml
# Color scheme supports "light" (default) and "dark"
color_scheme: dark
```
Comments
Some people need the ability to write sentences in their Markdown files that will not appear in the rendered output. These comments are essentially hidden text. The text is viewable by the author of the document, but it’s not printed on the webpage or PDF. Markdown doesn’t natively support comments, but several enterprising individuals have devised a solution.
To add a comment, place text inside brackets followed by a colon, a space, and a pound sign (e.g., [comment]: #). You should put blank lines before and after a comment.
`Here’s a paragraph that will be visible.
And here’s another paragraph that’s visible.`
The rendered output looks like this:
Here’s a paragraph that will be visible.
And here’s another paragraph that’s visible.