Set up Amarel
- Request Amarel account (linked to your netID) by filling out this form: https://oarc.rutgers.edu/amarel-cluster-access-request/
- PI name = Avram Holmes
- Campus = Piscataway
- Department = Center for Advanced Human Brain Imaging Research
- Request access to our lab partition on Amarel “/projects/f_ah1491_1” and “/scratch/f_ah1491_1” by emailing help@oarc.rutgers.edu and CC’ing Avram and lab manager
- Set up VPN if not on Rutgers wifi – VPN Setup Tutorial
Connect to Amarel
Connecting to Amarel in Terminal
Connect to VPN on Cisco Anyconnect App Tutorial
- fill in on Cisco Anyconnect app:
- vpn.rutgers.edu
- NetID password
- DUO mobile password
- or webpage: https://vpn1.rutgers.edu/+CSCOE+/logon.html#form_title_text
- fill in on Cisco Anyconnect app:
- Now, in your terminal…
- On terminal or shell scripting application, Enter
ssh netID@amarel.rutgers.edu(replace with your NetID) - prompts for password- Enter NetID password
- On terminal or shell scripting application, Enter
- Activate Holmes Lab Environment This is optional but enables you to use the packages installed for Holmes Lab scripts. Use to be able to use other Holmes Lab scripts.
conda activate /projects/community/holmesenv
NOTE: To access the Holmes Lab files from Jupyter Notebook in Amarel, you must create symlinks to the project and scratch directories.
The formula for creating a symlink is: ln -s /path/to/original /path/to/symlink. For example:
ln -s /projects/f_ah1491_1 ~/projects_f_ah1491_
This will create a folder in your home directory called projects_f_ah1491_1 that links to the Holmes Lab project directory. You can call the link any name. You can do the same for the scratch directory:
ln -s /scratch/f_ah1491_1 ~/scratch_f_ah1491_
Again, you can name it ‘scratch_f_ah1491_’ or any name you want.
Connecting to Amarel on your Browser
- Connect to VPN on Cisco Anyconnect App Tutorial
- Go to https://ondemand.hpc.rutgers.edu
- Select ‘Files’ > ‘Home Directory’ to browse, edit, download, upload and view files on Amarel from your browser

Use Amarel
Slurm Jobs
To run computing jobs from the terminal using Amarel resources, the process uses slurm. Here is a tutorial on how to create and submit slurm jobs.
Edit and Run Jupyter Notebooks in Amarel through browser
- Follow steps 1-2 of Connecting to Amarel on your Browser
- In the toolbar, select ‘Interactive Sessions’ > ‘Personal Jupyter’
- Fill out these fields for your session:
Number of Hours:72- Can be up to 2 weeks, but the longer number of hours, the longer it takes to get approved. Additionally, if Amarel has any scheduled downtime, and your number of hours overlaps with that, the request will stay “Pending” and won’t be approved.
72-96hours gets approved in a few minutes. - To check Amarel scheduled downtime, view the Holmes Lab shared google calendar “Holmes Lab - Out Of Office & Compute Cluster” or go to the Amarel System Status OARC page
- Can be up to 2 weeks, but the longer number of hours, the longer it takes to get approved. Additionally, if Amarel has any scheduled downtime, and your number of hours overlaps with that, the request will stay “Pending” and won’t be approved.
Number of Cores:20Gigabytes of Memory:128Partition:p_dz268_1- This is the CAHBIR partition
conda Path:/projects/community/holmesenv -conda environment:/projects/community/holmesenv-> Press “Launch”
- When it’s ready, you’ll see in
Interactive Sessionsthe blue button that says “Connect to Jupyter…”. Click it to begin - You’ll be directed to a page with your home filesystem (/home/netID)
- To create a new Jupyter Notebook, click ‘New’ > Python 3 (ipykernel)
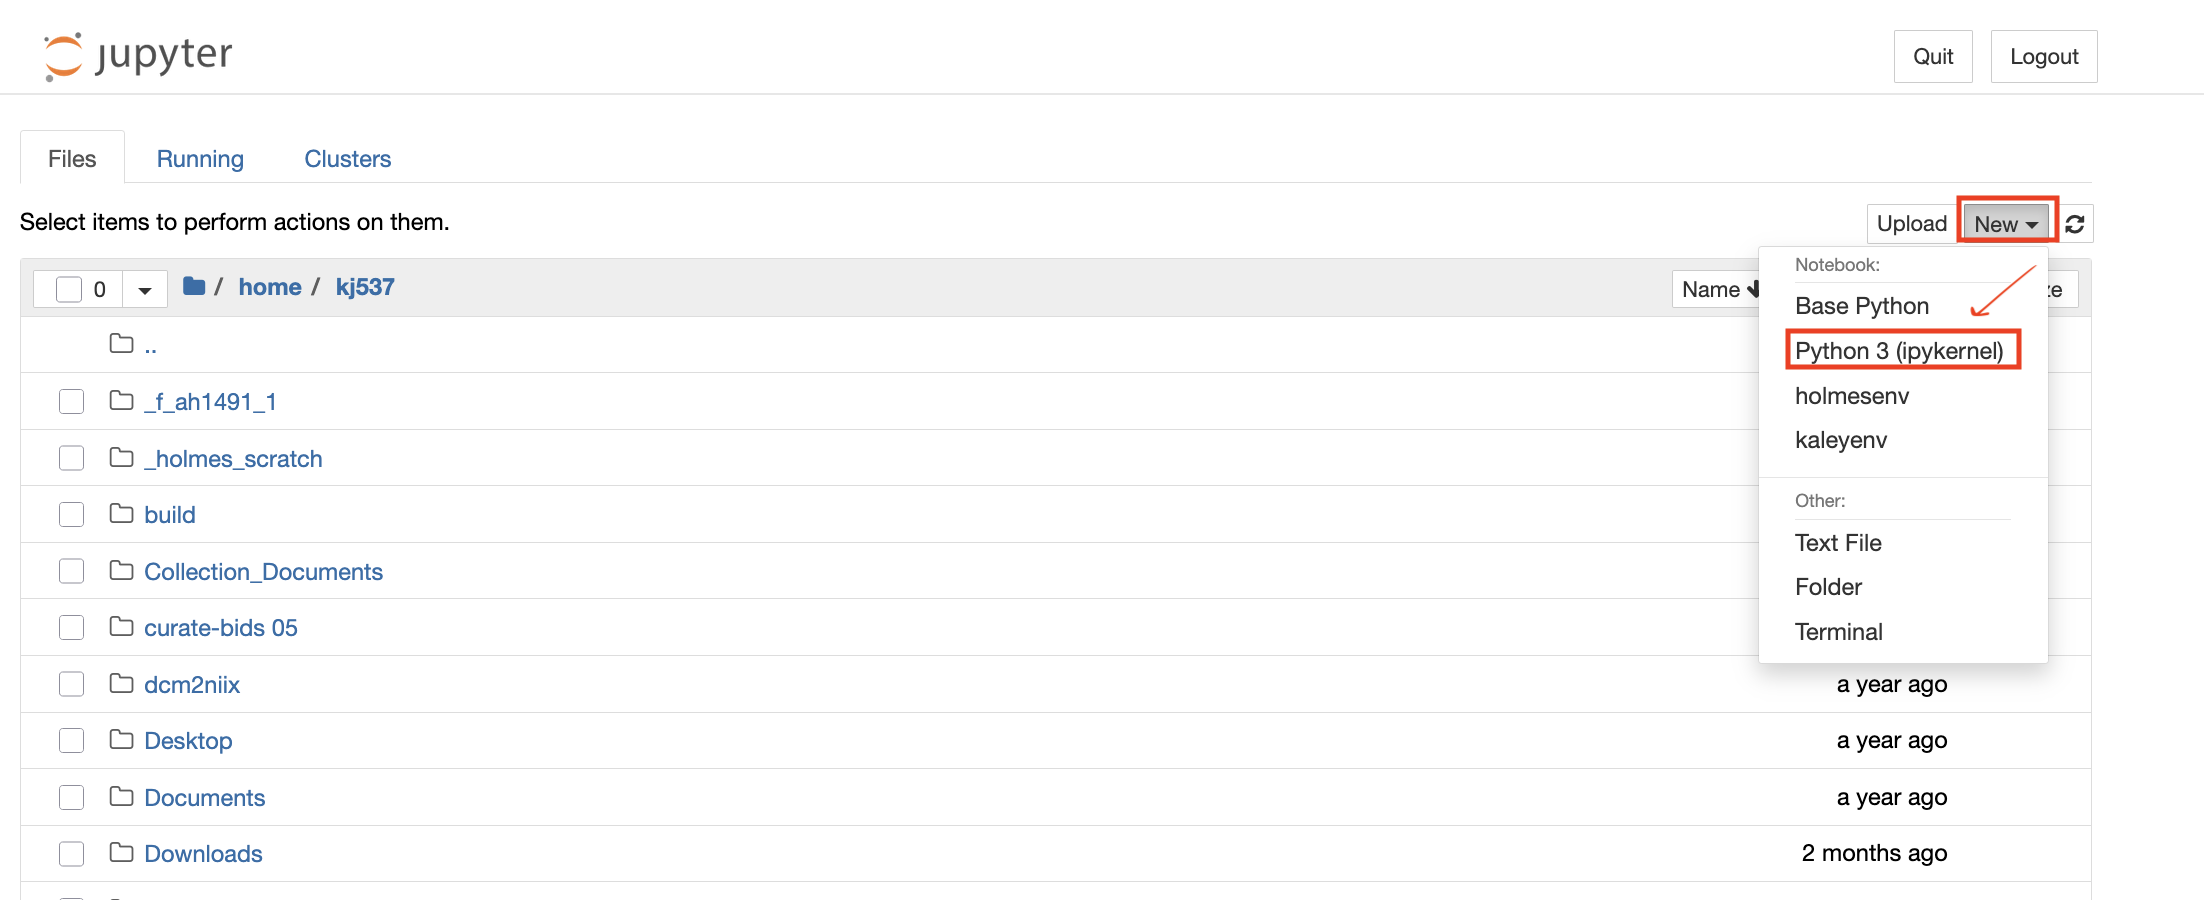
- The notebook file (.ipynb) will be created wherever you were in the filesystem when you pressed “New”
- To open an existing notebook (.ipynb) file, just navigate to it in the filsystem and click on it to open
- To create a new Jupyter Notebook, click ‘New’ > Python 3 (ipykernel)
Accessing Jupyter through terminal to run in browser
If you are unable to start up a notebook through OnDemand in browser, this is the alternative route
- On the terminal, first ssh into Amarel
ssh <your netid>@amarel-new.hpc.rutgers.eduBe sure to verify which amarel version to use or is most up to date
Navigate to where you would like to run your jupyter notebook from, as needed
- Start and interactive session
Template:
srun -p <partition> -c <number of cores> --mem=<number of total memory>GB --time=<time reserved up to 14 days dd:hh:mm:ss> --pty bash
Example
srun -p main-redhat -c 16 --mem=32GB --time=03:00:00 --pty bash
- Once resources have been allocated and session has started, within the session enter:
jupyter notebook --no-browser --ip=0.0.0.0 --port=8889This assumes you have Jupyter notebook installed within your environment.
Make note of the node your job lands on.
- In a separate terminal from the one you have your Jupyter session running on, enter the following:
ssh -L 9000:<node_name>:8889 <your netid>@amarel-new.hpc.rutgers.eduNode name is the node your Jupyter notebook is running on, and can be found in the other terminal
It will require you to input your password
- Once logged in on this terminal, open a browser and enter in webpage search: localhost:9000
In browser: localhost:9000 - You’ll be directed to a page with your home filesystem (/home/netID)
- To create a new Jupyter Notebook, click ‘New’ > Python 3 (ipykernel)
- The notebook file (.ipynb) will be created wherever you were in the filesystem when you pressed “New”
- To open an existing notebook (.ipynb) file, just navigate to it in the filsystem and click on it to open
- To create a new Jupyter Notebook, click ‘New’ > Python 3 (ipykernel)